***WARNING***WARNING***WARNING*** – The following contains photos of an actual disinterment. All faces are covered and no remains are showing, but if the subject bothers you DO NOT CONTINUE. It is posted for educational purposes showing how the work we do is carried out.

In this particular case there was no section map showing where the actual grave was located nor was there a headstone. Also, many burial cards were missing. So, the first thing the wise old owl had to do was to recreate a section map from partial records. This was a time consuming process involving finding burial locations from partial records that were available and then “trial fitting” those locations to different possible numbering systems until we could come up with something that matched. Once that was found, a map was drawn and we were able to zero in on a probable location.
These are some of the tools used.  The plastic is used to slide under the remains where it is necessary to lift the remains up, out of the grave, rather than lifting the entire casket itself in those cases where the casket has deteriorated and cannot be lifted intact. The box at the top is used for temporarily placing the remains in while in the grave in those situations where the body has disintegrated into pieces, or, where only the bones themselves remain. The bar with cables attached is a special lifting device to lift an entire box or vault itself. The very heavy rubber gloves are used when needed for handling remains directly, or, in cases where the grave is very wet. Lots of bleach is always kept for disinfecting purposes.
The lower picture of the plate is a “scraper plate” 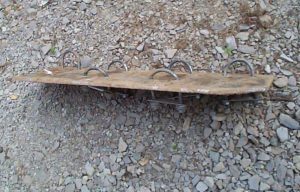 we sometimes use where the burial is known to be in a wooden casket (almost always collapsed and deteriorated). It is attached to the tines of the backhoe bucket to avoid ripping or damaging the remains, yet, allow us to mechanically dig close to the collapsed casket or remains – again without damaging them. Not all the tools shown in these pictures were needed in this disinterment, but the pictures show a basic selection. At that point, hand digging begins.


 The initial cut was made. Almost a foot down (it has been raised to the surface in the photo) we located a corner lot marker. The wise old owl was proud that the recreated map had placed the grave within a foot of this lot marker. We redrew our proposed excavation lines to conform with the new evidence provided by the newly discovered lot marker.
 Here, the excavation is continuing. The ground tarp you see is used to put the waste dirt on. The wise old owl likes to have lots of “eyes” to watch what is going on and to warn if we are close to something. It is difficult to see into an excavation. Also, as we get closer to the actual burial depth we use a probe (thin metal rod attached to a handle to gently press down to test what might be there),
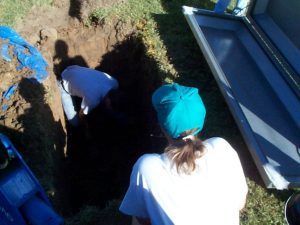 In photo to right, we have reached the top of a collapsed wooden casket (what we were expecting). The lady in the blue hat is a forensic anthropologist which we sometimes hire to confirm that the remains are consistent with what we are looking for. Because of the question of location, it was especially important in this particular disinterment.
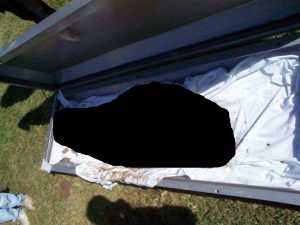
 When you reach the actual remains, the first thing you do is locate the head. Once this has been exposed you know where everything else is.